
PAYE Annual Return - Printing Guide - TD4 Supplementary Forms
Employers may now print their employee's TD-4 Certificates using an IRD pre-approved template.
The following templates are available
- Portable Document Format (.pdf) file
- Microsoft Word® Document Template (.dotx) file
A step by step guide on how to fill out and print TD-4 Certificates using either template is below.
Portable Document Format (.pdf) file
Suited for employers who submitted their TD4 Supplementary Form information manually or employers who only have a small number of forms to print.
-
Download the .pdf file (F-TD4_Supplementary--.pdf);
-
Enter relevant information
-
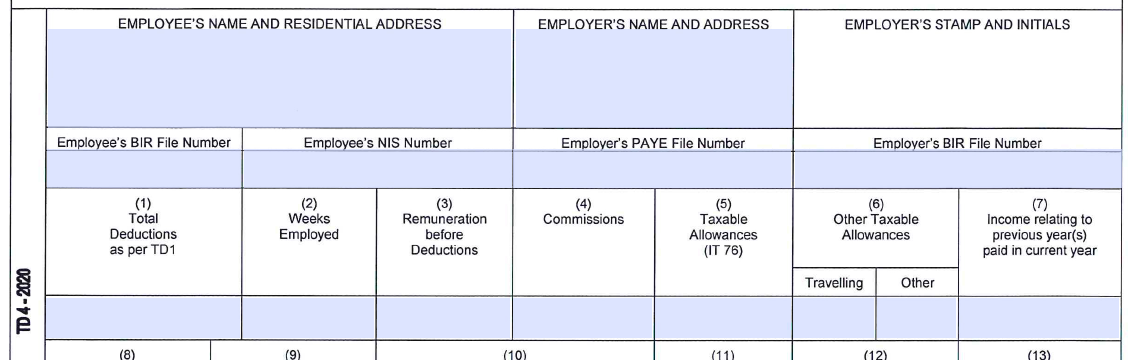
Fillable areas are usually highlighed in light blue;
- Click in the area where you want to enter information;
- Type the relevant information into the field;
- Repeat until all relevant information is entered into the template;
-
-
'Save As' or 'Print' the filled .pdf as necessary.
-
If the TD-4 is for severance pay, the employer may stamp the words "Severance Pay" below the Income Year in the top right corner, or they may download and use this .pdf file with the words already added (F-TD4_Supplementary_Severance--.pdf).
Please do not forget to stamp and intial the form.
Microsoft Word Document Template (.dotx) file
This process uses Microsoft Word's Mail Merge functionality to generate the TD-4 Certificates, as such proficency with Microsoft Office® (2013 or later) is required. Suited for employers who submitted their TD4 Spplementary Form information via .csv file upload or employers whose TD4 Spplementary Form information can be imported into Microsoft Word e.g. from an Microsoft Excel® file, or a database.
-
Download the .dotx file (F-TD4_Supplementary--.dotx);
-
Copy the file to the templates folder of Microsoft Word on your local machine;
- Windows 10: /Documents/Custom Office Templates/
- macOS (10.8 or greater): /Users/username/Library/Group Containers/UBF8T346G9.Office/User Content/Templates/
-
Launch Microsoft Word and start a new file based on the template by clicking File > New > Custom;
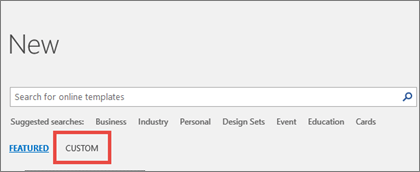
Note: For users of Office 2013, this button may say Personal instead of Custom.
-
Prepare the input data (TD-4 Supplementary infrormation) for a Mail Merge. If using a Microsoft Excel spreadsheet or a .csv file
- All data to be merged must be in the first sheet of the spreadsheet;
- Add column headings if not present. This will help match the field name to be inserted in the mail merge with the correct location in the template;
- Correctly format data entries with percentages, currencies, and postal codes in the spreadsheet so that Word can properly read their values;
- The Excel spreadsheet to be used in the mail merge is stored on your local machine or a network file share;
- Changes or additions to the file must be completed and saved before the file is connected to the mail merge document in Word. The file will not be available to be edited during the mail merge.
-
Connect to the data source.
- Microsoft Excel spreadsheet or a .csv file
- Go to Mailings > Select Recipients > Use an Existing List
- Browse to the location of the imput data file
- Click 'Open'
- Access database
- Open the Access database that contains the information;
- If the Navigation Pane if not open, Press F11 to open it;
- Select the table or querry that contains the information;
- On the External Data tab, in the Export group, clic Word Merge;
- Follow the steps of the Microsoft Word Mail Merge Wizard to complete the connection;
- Other database files
- Go to Mailings > Select Recipients > Use an Existing List then choose New Source to open the Data Connection Wizard;
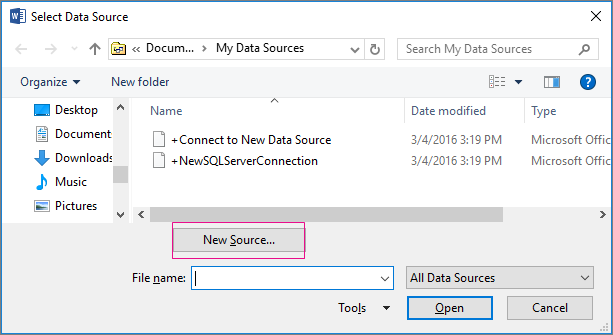
- Follow the steps of the Data Connection Wizard to choose and connect to the data source;
- Go to Mailings > Select Recipients > Use an Existing List then choose New Source to open the Data Connection Wizard;
- Microsoft Excel spreadsheet or a .csv file
-
Edit the mailing list
- Choose Mailings > Edit Recepient List
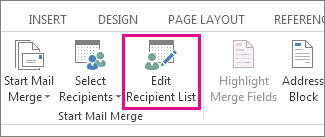
- In Mail Merge Recipients, clear the check box next to the name of any person who you don't want to print a TD-4 Certificate for
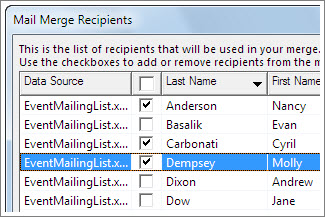
- Choose Mailings > Edit Recepient List
-
Insert a merge field linking to the relevant information.
- Fillable areas are highlighed in light grey
- Click in the grey area where you want a merge field
- Go to Mailings > Insert Merge Field
- A list of available data fields will be shown. Select the field name to be inserted.
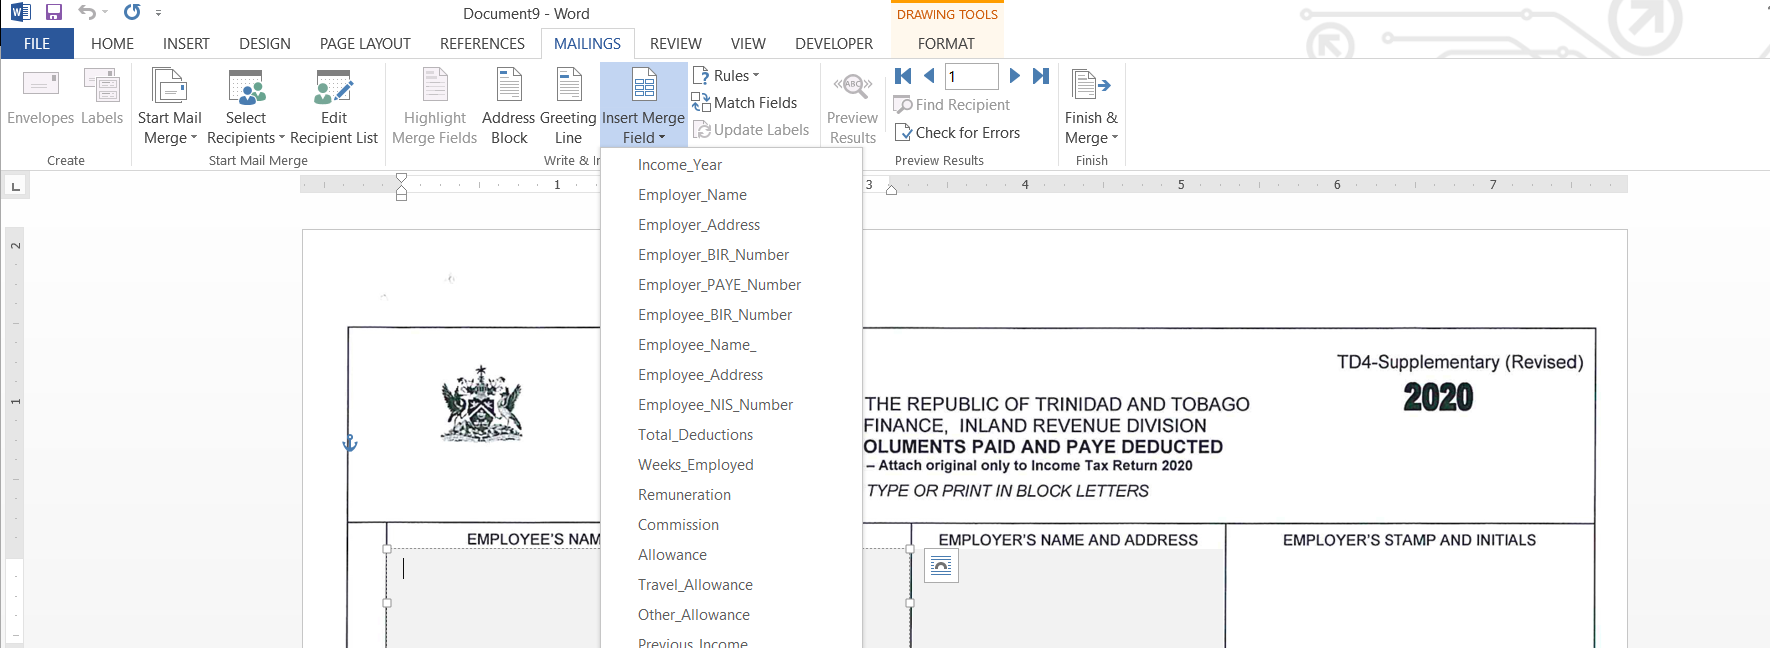
- Repeat, adding other merge fields, until all fields in the template are filled;
- Income Year:
The income Year needs to be inserted in two places, as shown below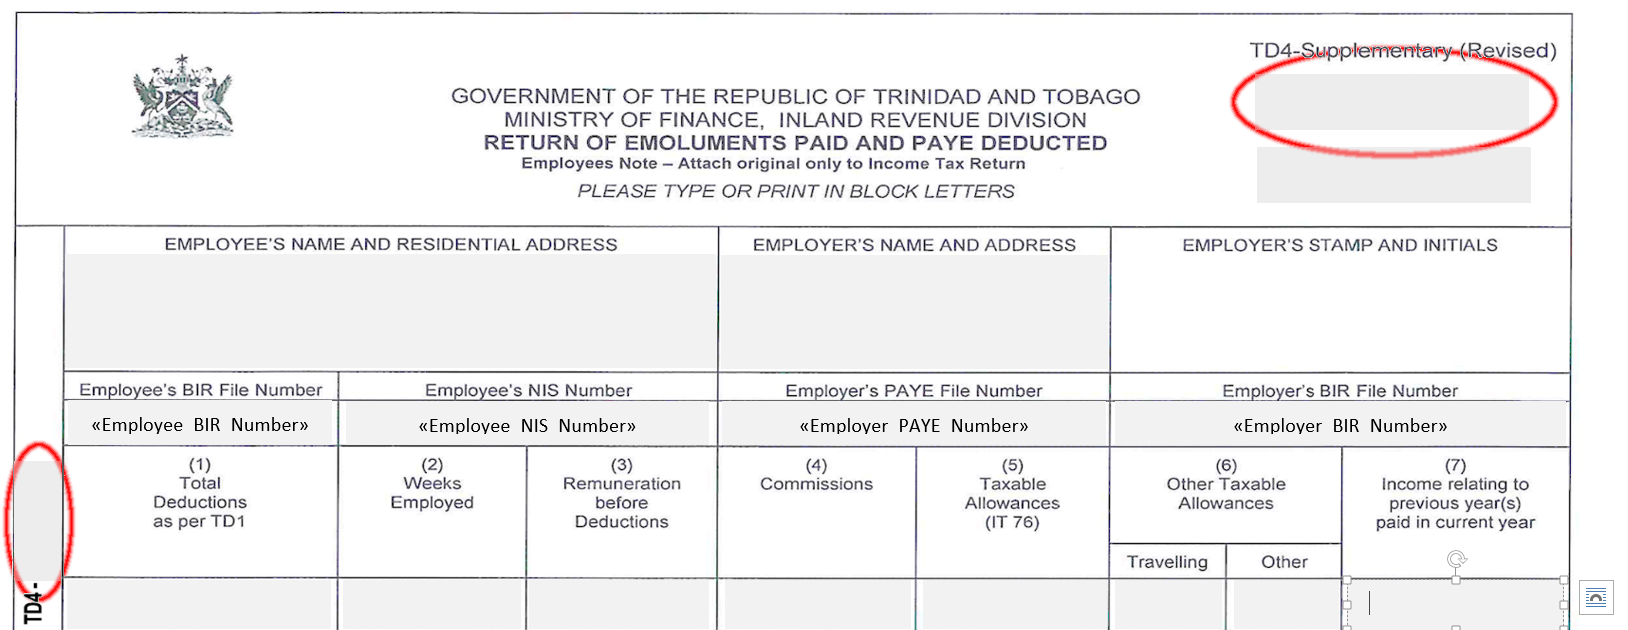
- Severance:
To show that the TD4 is for Severance, a conditional rule (IF ... THEN ... ELSE) needs to be used.- Select where you want the conditional text to be placed
- Press ALt + F9 to show the field codes
- To apply conditional formatting, Go to Mailings > Rules > If...Then...Else and a pop-up box will open

- In the Field name dropdown select the desired field from the data source you want to use for conditional text e.g. Is_Severance.
- In the Comparison box, choose a method for comparing the data value e.g. "Equal to".
- In the Compare to box, type in the comparison value e.g. "Yes"
- In the Insert this text box, enter the content that appears in the document when the comparison criteria is met e.g SEVERANCE.
- In the Otherwise insert this text box, type in the words that would be included in the document when the comparison criteria is not met (leave blank for nothing to be displayed).
- Select OK.
- If you want to apply conditional formatting manually, you need to use Ctrl+F9 to add the curly braces and the field codes.
- Similar logic may be used for Pension
-
Preview and finish the mail merge
- After you insert the merge fields you want, preview the results to confirm that the content is okay. and then you're ready to complete the merge process by clicking Mailings > Preview Results;
- Choose Next
 or Previous
  to move through records in the data source and view how they appear in the document.
 - Go to Mailings > Finish & Merge > Print Documents or Send E-mail Messages
- After you insert the merge fields you want, preview the results to confirm that the content is okay. and then you're ready to complete the merge process by clicking Mailings > Preview Results;
-
If the TD-4 is for Pension, the employer may stamp the word "PENSION" below the Income Year in the top right corner.
Please do not forget to stamp and intial the form.
Please note that absolutely no modifications or alterations to the header of the template is allowed.
Printing PAYE Annual Return Supplementary Forms (TD4 Certificates)
2018 - 2020
PAYE Annual Return Supplementary Forms (TD4 Certificates) must be printed
- On plain white paper;
- On US letter (8.5" x 11", 215.9 mm x 297.4 mm) or A4 (8.27" x 11.69", 210 mm x 297 mm) paper;
- On 20 lb or greater weight paper.
2021 -
PAYE Annual Return Supplementary Forms (TD4 Certificates) must be printed
- On plain white paper;
- On 20 lb or greater weight paper;
- Using narow margins (0.5" or smaller)
They can be printed
- On US statement (5.5" x 8.5", 139.7 mm x 215.9mm) paper;
- Or on US letter (8.5" x 11", 215.9 mm x 297.4 mm) or A4 (8.27" x 11.69", 210 mm x 297 mm) paper;
The following Print Settings may be used to print two Certificates on one US letter page.
- Print All pages
- Print One Sided
- Print uncollated
- Portrait Orientation
- Narrow Margins
- 2 pages per sheet
These settings may change based on make and model of printer. Please consult the manual of the specific printer to be used.